Click here to watch latest videos and best practices on SharePoint…
Sunday, November 21, 2010
Friday, November 19, 2010
Difference between Closed and Deleted Web Part

Let's understand what really happens when one clicks the X button on Web Part.
What user is thinking now his Web Part is deleted from the site. In fact its not completely deleted rather its just 'Closed'. The Web part still resides onto your SharePoint site using your server resources on subsequent page loads.
When user thinks he accidentally deleted Web Part he will again perform the same function of adding the same web part adding redundant load on the server unknowingly.
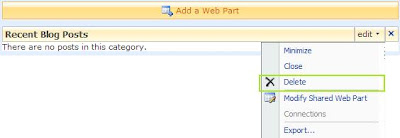
Here is a way to permanently 'Delete' a Web Part. Instead of Clicking on Close 'X' button we can go to
Site Actions > Edit Page: Find the web part and click: edit > Delete As shown in the snapshot below.

Done! Web part is deleted for permanent which helps in increasing your site performance.
Alternate way to view and delete web parts - Browse to SharePoint Site URL with additional parameters like below.
http://mySharePointSite/Sites/Default.aspx?contents=1
The page will give you option to select multiple Closed/Open web parts so that you can Delete, Close or Reset all of them at once.
Have Fun with SharePoint!!!!
SharePoint How to Videos
Thursday, November 18, 2010
What is SharePoint?
SharePoint is basically a Content Management System from Microsoft, today known as MOSS - Microsoft office SharePoint server.
MOSS is often used for collaboration, file sharing and web publishing. It allows organizations to create document sharing workspace with features as Authentication, File versioning, Check in-Check out etc.
MOSS is build upon ASP.Net 2.0 platform hence its highly customizable too. To get idea of how SharePoint helps in collaboration see below video.
Wednesday, November 17, 2010
How to create a SharePoint Site Programatically
Often you get a requirement from user to create SharePoint site for them. You are flooded with 1000's of such user request, and you don’t have time to work on each of the request. SharePoint Object model is there to help you out. How?
Using SharePoint Object model you can create SharePoint Site programmatically.
· Create a SharePoint Web Part which will take required information from user for the site like Site Name, Site Language, Site template(See table below)
· Use above information and once user has submitted all required information run the SharePoint API to create a SharePoint site.
Let’s see the code now which can be written inside Web Part.
SPSite site = SPContext.Current.Site;
SPWeb web = site.OpenWeb();
SPWebCollection sitesCollection = web.Webs;
SPWeb webSite = sitesCollection.Add("sitename", "Description of the Site", "This is site created programmatically.", 1033, "STS#2", true, false);
That’s it. You have just crated a SharePoint site using SharePoint Object model.
Let’s understand few important parameters from above code.
Below are Site Definitions used to create a Site with pre-defined template.
| Value | Site Definition |
| STS#0 | Team Site |
| STS#1 | Blank Site |
| STS#2 | Document Workspace |
| MPS#0 | Basic Meeting Workspace |
| MPS#1 | Blank Meeting Workspace |
| MPS#2 | Decision Meeting Workspace |
| MPS#3 | Social Meeting Workspace |
| MPS#4 | Multipage Meeting Workspace |
| WIKI#0 | Wiki |
| BLOG#0 | Blog |
1033 is to create Site in English Language.
Deploying Event Receivers
This can be done in either below three ways
- Deploy programmatically through code
- Using STSADM command ( SharePoint Feature)
- Using content types
Let’s see how to deploy using code. This method is not suitable when you are working in Development life cycle. Best practice is to create a Feature and deploy that to your production server and you are good. But for illustration purpose lets see the code way!!!
In my previous post we created simple Event Log event receiver which logs the user entries in a text file. Lets deploy the same Event Receiver.
Console Application for Deploying Event Receiver:
using System;
using System.Collections.Generic;
using System.Linq;
using System.Text;
using Microsoft.SharePoint;
namespace DeployEventLog
{
class Program
{
static void Main(string[] args)
{
SPSite spsite = new SPSite("http://SharePointForFun:555/");
SPWeb mysite = spsite.OpenWeb();
SPList theList = mysite.Lists["EventLog"];
SPEventReceiverDefinition newReceiver = theList.EventReceivers.Add();
newReceiver.Class = "EventLog.LogEvent ";
newReceiver.Assembly = "EventLog",
Version= 1.0.0.0,Culture=neutral,PublicKeyToken=234c6d4671b2a894";
newReceiver.SequenceNumber = 5055;
newReceiver.Type = SPEventReceiverType.ItemAdded;
newReceiver.Update();
Console.Read();
}
}
}
That's it. Once you run this console application Event gets deployed to the SharePoint server defined in the SPSite object. Have Fun with SharePoint.
SharePoint List Event Handler
List event handlers are made possible through the concept of event receivers.
An event receiver is a .NET framework class contained in the strong-typed assembly in GAC.
One of the prime examples of using event receivers is to log the entries for admin purpose to track the changes to list data.
1. Create a class that inherits from SPListEventReceiver or from SPItemEventReceiver.
2. Strong name the assembly.
3. Deploy assembly to GAC
4. Deploy the event receiver with code to SharePoint.
Sample List Item Event Receiver Code:
After you have written your event receivers you can follow steps 2 and 3 mentioned above.
I will explain in my next article how you can deploy the event receiver to SharePoint using code.